Documentation
For AutoML documentation, visit: https://docs.qeexo.com
FAQs
When uploading CSV files, you will be asked to create an Environment and select the sensors and their configurations. What you select here must match with what is described in the CSV file.
We discovered that the stock firmware from ST (the latest FP-AI-SENSING1 package) is disabling USB CDC (Communication Device Class) device by default, thus causing the issue you described.
Instead, please use the “DataLogExtended.bin” firmware from this package of FP-SNS-STBOX1. If you flash this firmware, Virtual COM port will be recognized on Windows 10, and then you should be able to follow the rest of the installation instructions for Qeexo AutoML.
Click on “MANUAL CALIBRATION” on the Live Testing screen and enter a threshold between 0 to 1. Please refer to the Qeexo AutoML User Guide for additional information.
Probability for one-class classifiers are in the range (0, 1], i.e., 0 < Probability <= 1. Whether there is an anomaly in sensor readings is determined by thresholding this probability. If threshold is beta, Qeexo AutoML performs the following computation to detect anomaly:
IF Probability < beta:
Signal is Normal
ELSE:
Signal is Abnormal
If you are using macOS and experiencing problems installing or using Qeexo AutoML, we have a diagnostic utility that can help! Simply follow these steps and email the diagnostic report so that our team can analyze the problem:
Step 1. Download and run the diagnostic utilty
Visit this LINK to download the diagnostic utility.
Once this zip file is saved on your mac, double click it to uncompressed. Then double-click Qeexo AutoML Diagnostics to launch the utility

Step 2. Create the diagnostic report
Once the utility is launched, click the “Create Report” option so that the utility can start gathering relevant information to create a report. This may take 5 to 10 minutes.
Step 3. [Optional] Review the generated report
If desired, click “Show Report in Finder” to review the content of the generated report; otherwise, move onto next step.
Step 4. Email the report to Qeexo
After clicking “Email Report to Qeexo Support” option, your mac Mail app will be launched and a draft email (with the report as attachment) will be created:

Feel free to hit send, or use other email applications to send us the report at no-reply-diagnostics@qeexo.com
Absolutely! Please follow these steps:
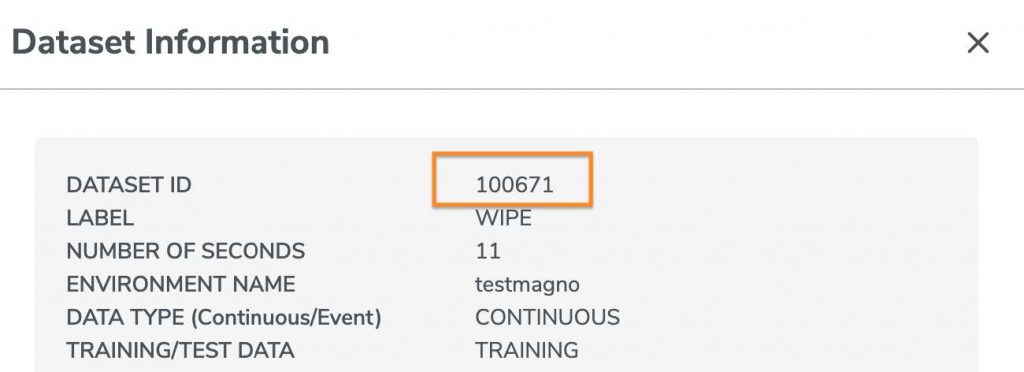
1. Locate the dataset that you would like to download from DATA tab in Qeexo AutoML and click “Data Information”. In the following example, I am interested in the WIPE class label:

2. Then highlight and copy the set id:

3. Substitute the dataset id in the following URL and enter in the web browser (continue to stay logged in Qeexo AutoML):
https://automl.qeexo.com/api/download_data/e.g. https://automl.qeexo.com/api/download_data/100671
The CSV file for that dataset will be downloaded.
Yes. Qeexo is continuing to add support for other hardware modules. Please stay tuned for our announcement for the next hardware support.
Here is a Python script (link here) that can convert a WAV file to CSV format so that your data becomes compatible with Qeexo AutoML. Depending on the original frequency of the sound file, the script conducts re-sampling to 16kHz, which is the ODR we work with.
If your sound files are in MP3 format, we recommend using ffmpeg to convert them to WAV files first before feeding them to this python script.
Please contact support@qeexo.com if you have more questions on this.
Currently, Bronze users can collect up to 12 hours of data per Collection.
The accelerometer and gyroscope are on a single Inertial Measurement Unit (6-axis IMU), and currently share settings.
“Instance Length” is the time duration in milliseconds of each window on the sensor data stream that we want to classify. “Classification Interval” is the time gap in millisecond between running each classification. You can let AutoML choose these values for you by selecting “Determine Automatically”, or you can enter them manually.
Depending on the application, data, and use case, there may not be one model that performs best for all metrics: accuracy, latency, and memory size. AutoML allows you to build multiple models all at once, so you can compare the performance results and select the best model that suits your needs.
You can simply create a new project with the desired classification type and target hardware.
Multi-class classification can classify data into all the classes of interest, while single-class classification tells whether a given set of signals belong to the single class of interest. Multi-class projects need data and labels for all the classes of interest. Single-class projects need data only from a single class of interest, e.g., data from normal operating condition of a machine in an anomaly detection use case.
No, account sharing is not allowed. Multi-user access is available on Pro and Enterprise tier subscriptions. Check out the Pricing page for more details.
First, make sure you are logged out of your account. Then, from the login page, click “Forgot password?” and follow the change process from there.
Currently Bronze tier is the default level if you signed up through the website. To upgrade to Pro or Enterprise tier, click the CONTACT US button on the Pricing page under the tier you are interested in.

