Project Description
We would like to build a machine learning model to distinguish between the following three classes:
– “X”
– “O”
– No gesture
This blog describes building the Air Gesture with Arduino Nano 33 BLE Sense. You can also build the same using any of the boards available on your Qeexo AutoML.
Sensor Configuration
For any sensor configuration, we need to consider three factors:
- What type of data will capture the differences between our classes
- What signal length will capture the differences between our classes
- What range of sensor values will fully capture the range of our input
Based on these factors, we will select accelerometer and gyroscope sensors at 476 Hz for the air gesture problem. We will use +/- 8g and +/- 500 dps for the sensor FSRs.

These two sensors should be able to capture the type of data well, since they are motion sensors and our problem deals with differences in device motion.
Based on hardware memory constraints, we can only use 1024 samples per-channel on the Arduino Nano 33 BLE Sense, so an ODR of 476 Hz should allow us to have a signal length of multiple seconds to make each classification.
Finally, based on the fact that the device will be in motion, we will need a large range of possible sensor values. These larger values of FSR will prevent our sensors from saturation, even under scenarios of rapidly changing device position and speed.
Data Collection
For these three classes, we will need to use both types of AutoML data collection: event and continuous. To decide which type of data collection to use for each class, we need to consider the average time spent in a given class. If this time is 10 seconds or less, we should typically use event data collection. Otherwise, we’ll use continuous data collection.
Collecting continuous data
For the “no gesture” case, we will use continuous data collection, because we will often expect our final ML classifier output “no gesture” for long periods of time, sometimes minutes or even hours. We want our classifier to output “no gesture” for as long as the device is at rest. To collect continuous data, we will select Continuous, enter an appropriate class label, and enter an amount of time for an initial data collection. For now, we will collect 30 seconds to build an initial model – we can always collect more later if we find that performance isn’t as good as we’d like.

From there, we will press “Record” and go on to collect our “no gesture” data.
Collecting event data
Since the “X” and “O” letter gestures are discrete events, typically entering and exiting the class within a second or two, we will use event data collection.
To collect event data, we will select Event, enter an appropriate class label, and enter two additional values: a length per event, and a number of instances. For now, we will collect 10 instances to build an initial model. For length per event, we will select a number of seconds which will give you enough time to complete a full example of the given class. For example, since the “X” class takes 1-2 seconds typically, we will use a value of 3 or even 4 seconds to make sure we can complete the gesture in time.

From there, we will press “Record” and go on to collect our “X” and “O” letter gesture data.
Note: at the start and stop of each “event”, the device should be in an at-rest state. This will help AutoML to segment the incoming signal and determine where the actual event data occurred inside the collection window. This is why we should select a value for length per event which ensures we can start and stop the given event within the allotted time.
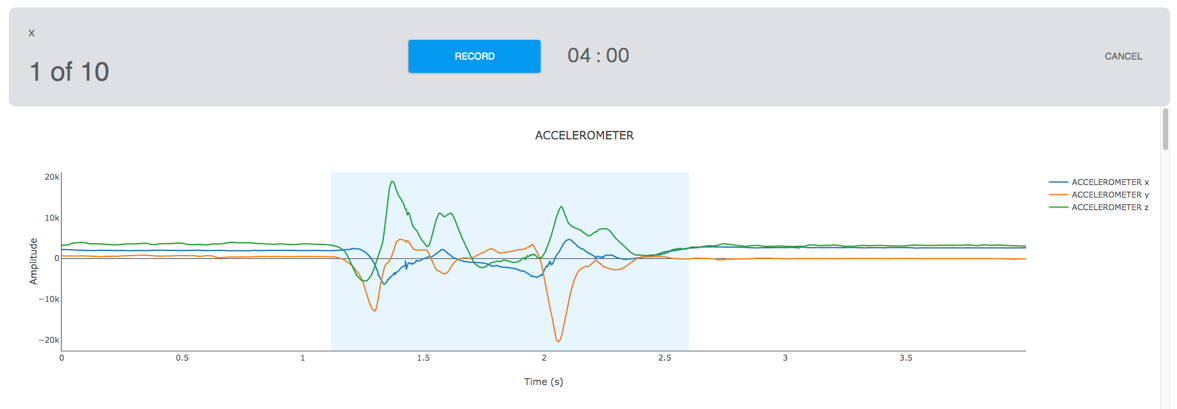
Here’s an example of a good event instance:

Note how the actual event is located fully within the collection window, and that AutoML is able to detect both the start and stop and highlight the event signal.
Here’s an example of a bad event instance:

When compared with the previous image, you can see how AutoML is not able to successfully find the full event range.
Model Training
After configuring our sensors and collecting our data, we are ready to build an initial model. We will select the data from our Training page and press “Start New Training”.

NOTE: The initial window that appears (step 1 of 4) is an optional “Group Labels” page. We can skip through this page for now, since we’ve only collected three classes of data, and we want to build a model which can distinguish between all three classes.
Sensor and Feature Selection
You will now be presented with Sensor and Feature Selection options (step 2 of 4). This section allows choosing a subset of recorded sensors and features to compute for each sensor, either automatically or manually. The automatic mode performs sensors and feature group selection fully automatically. Manual sensor selection can be combined with automatic feature selection or manual feature selection. For now, since this is our initial model, we will manually select both the recorded sensors, Accelerometer and Gyroscope and manually select all the feature groups available with both the sensors.
Configuring Inference Settings
The next step in building our initial model is configuring the inference settings (step 3 of 4). There is an option to have AutoML make these selections for you. If you want to use that option, please skip to the next section.
To manually configure the inference settings, we need to consider two things:
- How long does the signal need to be for our model to make an informed decision?
- How often does the class change for my problem?
In our case, our event signals last roughly 1-2 seconds. This timeframe should also be long enough to distinguish between either of our gestures and the “no gesture” class. Based on this reasoning, we will select 2000 ms as our instance length.
Since the current gesture class is user-controlled, and since we can move between classes quickly, we should select a fairly low value for the classification interval. A value of 500 ms should make classifications often enough to catch any changes between states.

Configuring Model Settings
The final step in building our initial model is configuring the model settings. There are a variety of options on this page, all of which control various aspects of the model-building process. You can select from among various models, chose to do hyperparameter optimization, or decide whether to generate learning curves.
For now, we will de-select all of the optional optimizations available at the top of the page and train a simple Logistic Regression model.
and train a simple Logistic Regression model. This model should be able to handle our small dataset well, as opposed to the deep learning models for which we might not have enough data and will hopefully find some simple patterns which can distinguish between these three classes.

Next you will see the real-time training progress of various steps of machine learning model training and results generation. Clicking on Training Results will show cross validation performance, library size, and latency of the model. Details will show many other results such as confusion matrix, ROC curves, and MCC matrix. You can flash the library using Live Test and after flashing is successful, your Arduino Nano 33 BLE Sense is ready to detect one of these three gestures.